
Key Takeaways
- Refinishing hand scraped hardwood floors can enhance their natural beauty and extend their life.
- Proper preparation, including cleaning and assessing the floor’s condition, is essential for a successful refinishing project.
- Sanding hand scraped floors requires a gentle approach and the right grit selection to maintain their unique texture.
- Test staining and careful application of sealant will ensure a stunning, even finish.
- Regular maintenance will keep your refinished floors looking great for years to come.
Why Refinish Your Own Floors?
Imagine the satisfaction of seeing your worn-out floors transform under your own handiwork. Not only do you get to witness the change, but you also control the outcome. With a bit of patience and the right approach, you can give your floors a custom, refreshed look that’s entirely your own creation.
Tools and Materials You’ll Need
Before we start, let’s make sure you have everything you need. Here’s a quick list:
- Drum or orbital sander (rental is fine)
- Sanding pads with various grits (60, 80, 100, 120)
- Wood filler (if necessary)
- Stain (optional, for color changes)
- Sealer (polyurethane or your choice of finish)
- Brushes or applicators
- Respirator and safety glasses
- Ear protection
- Shop-vac for cleanup
With your toolkit ready, you’re all set to start the journey of floor refinishing.
Prep Work: The Foundation of a Great Refinish
Good prep work is like setting a strong foundation for a house – It’s essential.
Clearing and Cleaning Your Workspace
Let’s get that space ready. Start by removing all furniture, rugs, and drapes from the room. You want a clear space where you can move freely without obstacles. Then give the floor a thorough cleaning to remove all dust and debris. Any grit left on the floor can wreak havoc during sanding.
Don’t forget to check for nails or staples in the floor. These little buggers can damage your sanding pads and, worse, cause injuries. Sweep up, then follow with a vacuum, and finally, wipe down the floor with a damp cloth. You want a clean canvas for your masterpiece.
Assessing Your Hardwood’s Condition
Next, take a good look at your floor. Are there deep gouges or loose boards? These will need attention before you start sanding. Fill any holes with wood filler and let it dry completely. If you’ve got loose boards, now is the time to secure them. Your floor should be flat and stable before you proceed.
Step-by-Step Guide to Refinishing Hand Scraped Hardwood Floors
Refinishing hand-scraped hardwood floors can rejuvenate the beauty of your space, but it requires careful attention to detail. With these steps, you can confidently tackle this rewarding project and transform your space with ease.
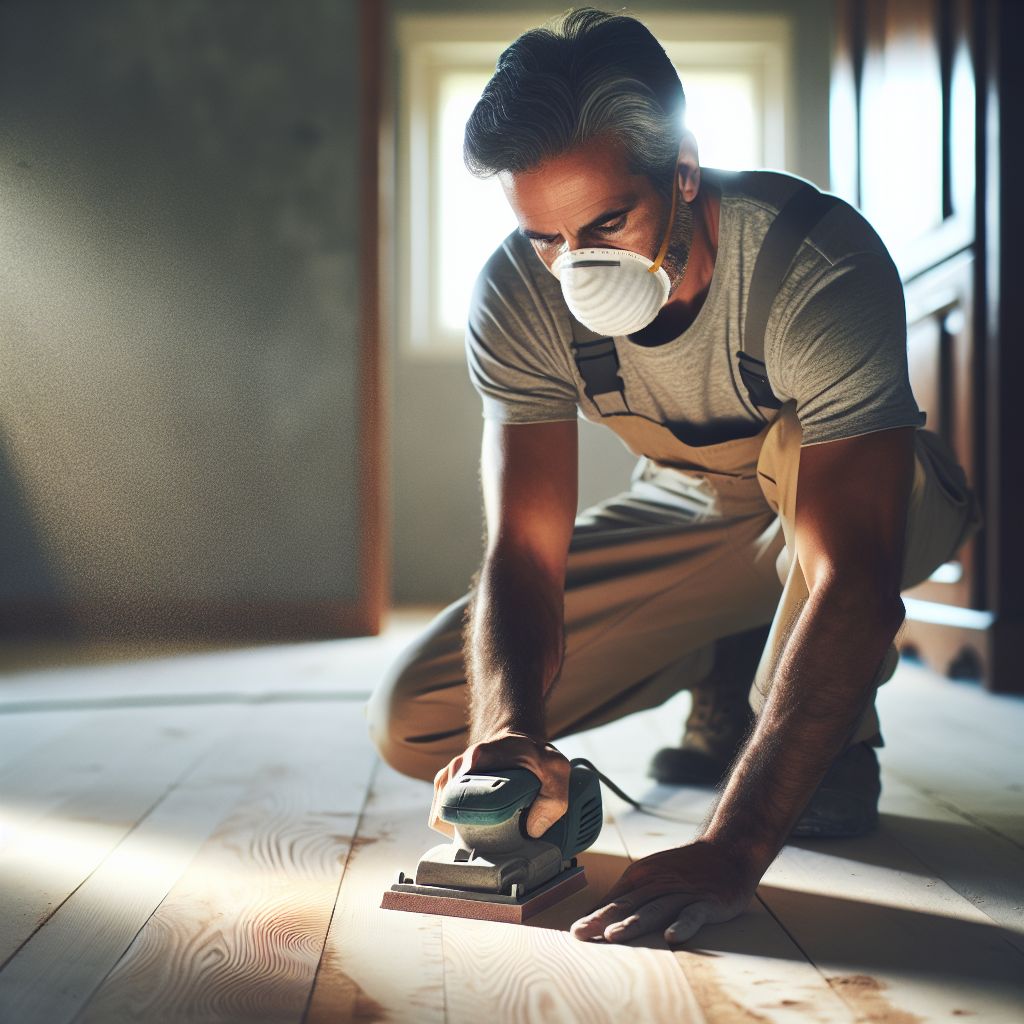
Step 1: Sanding: The Heart of Transformation
Sanding is where the magic happens. It’s the process that strips away the old and prepares for the new. But with hand scraped floors, you’ve got to be gentle. You want to preserve those unique contours that give your floor character.
Choosing the Right Grit
Start with a coarser grit to remove the old finish and work your way up to finer grits for a smooth surface. Here’s a simple guideline:
- Begin with 60-grit to remove old coatings and major blemishes.
- Move up to 80-grit to start smoothing out the surface.
- Progress to 100-grit for further refining.
- Finish with 120-grit for a polished look before staining or sealing.
Remember, the goal is to sand just enough to renew the surface without losing the hand scraped texture.
Step 2: Staining: Bringing Out the Gorgeous Grain
Staining is optional, but if you’re looking to change the color of your floors or enhance the natural grain, it’s a game-changer. Staining can bring out the richness of the wood and give your room a whole new vibe. Just be sure to choose a stain that complements your home’s style and the type of wood you have.
Test Staining: Finding Your Perfect Shade
Before you commit to a color, test the stain on a small, inconspicuous area or a spare piece of similar wood. Stains can look different once applied and dried, so this step is important. Let the test spot dry completely to get the true color. This way, you can make an informed decision without regrets.
Apply the stain with a brush or rag, going with the grain of the wood. Be generous but not excessive—you can always apply a second coat if you want a darker shade. Remember, it’s easier to go darker with another coat than to lighten a stain that’s too dark.
Once you’ve found the shade that speaks to you, it’s time to stain the whole floor. Work in manageable sections and always keep a wet edge to avoid lap marks. This is where your floor starts to show its new personality, so take your time and enjoy the process.
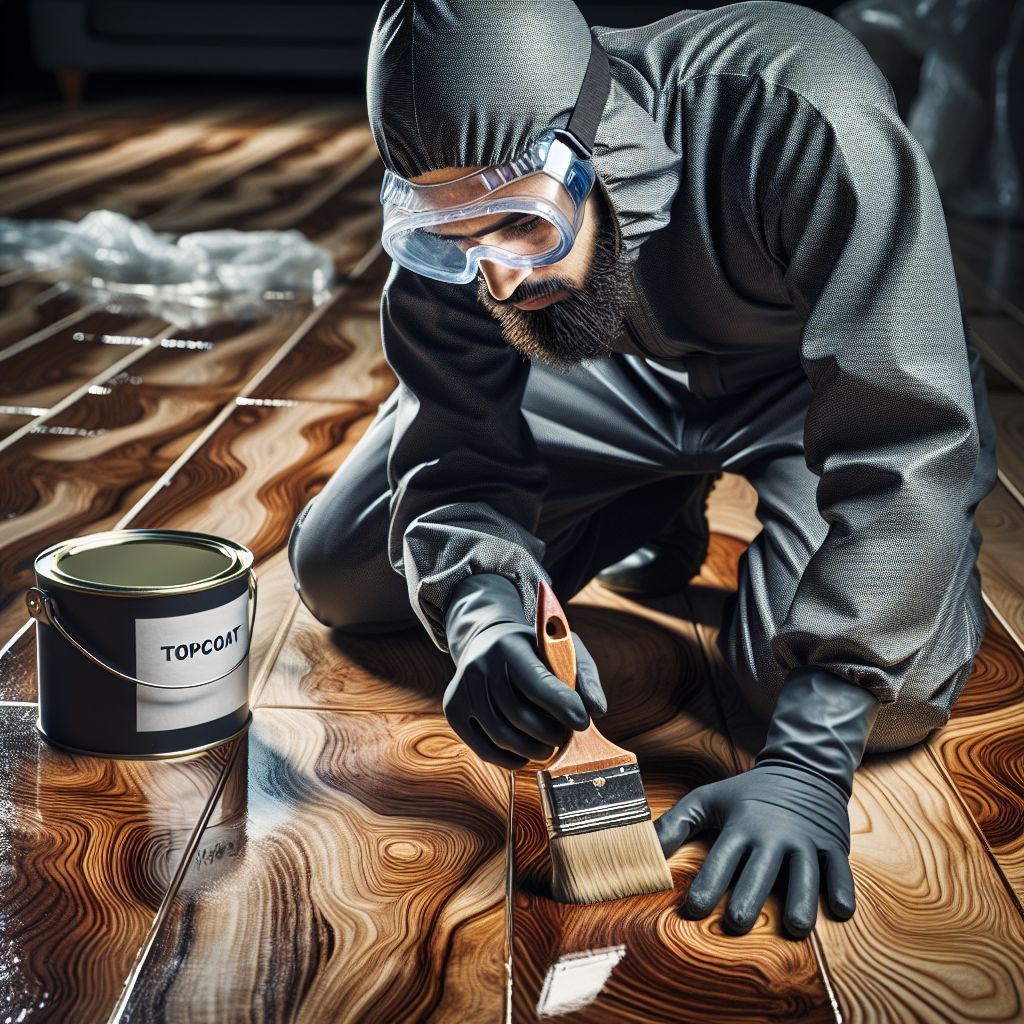
Step 3: Sealing the Deal: The Final Coat for Protection
Once your stain has dried completely, it’s time to seal your hard work. The right top coat will protect your floors from scratches, spills, and everyday wear and tear. It also adds that final luster that makes your floors look professionally done.
Selecting Your Top Coat: Polyurethane vs. Others
There are a few options for sealants, but polyurethane is a popular choice for its durability and ease of application.
Consider the following when selecting your top coat:
- Water-based polyurethane: Dries quickly, less odor, easier cleanup with soap and water.
- Oil-based polyurethane: More durable, enhances grain visibility, requires mineral spirits for cleanup.
Application Steps:
- Apply your top coat with a high-quality brush or applicator pad.
- Start at the farthest corner and work your way out of the room.
- Apply thin, even coats to avoid bubbles and drips.
- Between coats, give it a light sanding with a fine-grit sandpaper to ensure a smooth finish. This also helps the next coat adhere better.
After the final coat, give it plenty of time to dry. Rushing furniture back in can lead to marks and damage. Follow the manufacturer’s recommendations for drying times, and when in doubt, give it a little longer.
Bonus Tips and Tricks
Let’s wrap up with some pro tips to take your refinishing project to the next level. These are the little secrets that can make a big difference.
How to Tackle Tough Spots and Corners When Sanding
For those hard-to-reach spots and corners, a detail sander or even hand sanding can be your best friend. Take your time in these areas, as they often get overlooked. A smooth, even finish throughout is the hallmark of a professional job.
If you’re dealing with intricate details or tight spaces, consider using a stain pen for precision work. It’s like a magic wand for those pesky little areas.
Sanding Safety Tips
Before you fire up the sander, let’s talk safety. Sanding can be messy and, if not done carefully, hazardous. Always wear a respirator to avoid inhaling dust. Safety glasses are a must to protect your eyes, and ear protection will keep the noise from becoming a nuisance. Keep the area well-ventilated, and take breaks to avoid fatigue. Safety first, because you want to enjoy those floors once they’re done, not nurse an injury.
Stain Application Techniques for Even Coverage
For an even stain application, work in sections and use long, smooth strokes. If you’re using a brush, make sure it’s high-quality—cheap brushes can shed bristles and ruin your finish. If you prefer a rag, use a lint-free one to avoid leaving behind particles. And most importantly, wipe off any excess stain as you go to prevent a tacky finish.
Some areas might absorb the stain differently, which is part of the charm of hand scraped hardwood floors. If you find spots that are too light or too dark, don’t panic. You can blend these areas with a dry brush or rag to achieve a more uniform look. Patience is key here; rushing can lead to a blotchy finish.

Maintenance: Keeping Your Floors Stunning
Your floors are refinished, and they look amazing. Now, let’s keep them that way. Regular maintenance is the key to longevity. Simple steps can prevent damage and keep your floors looking like new.
Everyday Care for Hardwood Floors
Start with a no-shoes policy to minimize scratches. Use felt pads under furniture legs, and when moving furniture, always lift rather than drag. Sweep or vacuum regularly with a soft brush attachment, and when mopping, use a damp—not wet—mop. Water is wood’s enemy, so wipe up spills immediately.
Dealing with Future Scratches and Wear
Even with the best care, scratches and wear are inevitable. For minor scratches, a touch-up kit can work wonders. For deeper gouges, you might need to use wood filler and reapply stain and sealer. Remember, your floors are a living part of your home; they tell a story. Embrace the minor imperfections—they add character.
Refinishing your hand scraped hardwood floors is a journey. It takes time, effort, and a sprinkle of creativity. But the reward is a home that shines with your personal touch, floors that tell a story of renewal, and the pride of a job well done. So go ahead, take the first step, and let the beauty of your floors inspire you every day.

Frequently Asked Questions
How often should hand scraped hardwood floors be refinished?
Hand scraped hardwood floors don’t need to be refinished often. Typically, every 7 to 10 years is enough, depending on the traffic and wear. If you take good care of them, you might even push that to a longer interval. Just keep an eye on the finish—if it starts to look worn or scratched, it’s time to refinish.
Can I refinish hardwood floors without sanding?
Yes, but it’s called recoating rather than refinishing. If your floors are in good condition and you just want to refresh the top layer of sealant, you can apply a new coat of finish without sanding. This works best when there’s no damage to the wood itself and you’re not looking to change the color.
What’s the best way to clean dust after sanding?
After sanding, you’ll want to get rid of all the dust to ensure a clean finish. First, vacuum thoroughly with a shop vac equipped with a fine dust filter. Then, wipe down the floors with a microfiber cloth or tack cloth, which is designed to pick up and hold dust particles. Repeat this process until you’re confident all the dust is gone.
Is it possible to change the color of my hand scraped hardwood with refinishing?
Absolutely! Refinishing is the perfect time to change the color of your floors. Just remember that the stain will look different on various species of wood, so always do a test patch first. Keep in mind that darker stains can hide some of the natural variations in the wood, while lighter stains will highlight them.
How long does it take for the refinished hardwood floors to dry?
The drying time for refinished hardwood floors can vary depending on the type of finish you use. Water-based polyurethane typically dries faster, often within 24 hours. Oil-based finishes may take 48 hours or more. However, it’s best to wait a few days before moving furniture back in and a week before laying down rugs. Always follow the manufacturer’s guidelines for the best results.
So there you have it, a complete guide to DIY refinishing hand scraped hardwood floors. With the right tools, a bit of elbow grease, and a healthy dose of patience, you can give your floors a second life. Remember to take your time, follow each step carefully, and don’t be afraid to express your creativity. Your floors are not just the foundation of your home—they’re a canvas for your personal style. Happy refinishing!


Leave a Reply